The M.A.M.E Cabinet - 'INSERTED COINS' - Part 2(b)
PART 2B:
‘DON’T PUT MY LOVE UP ON NO SHELF…’
‘DON’T PUT MY LOVE UP ON NO SHELF…’

Instead, I decided to figure out how to mount a shelf for a control panel. The initial panel would be a pre-built two player control panel from ‘X-Arcade’, purchased from my local ‘Fry's Electronics’. More than I wanted to spend but I was a man possessed…and my wife gave me permission. WOOT!
That meant that I had to figure out how to get this thing level. Since I determined that the skeleton of the cabinet wasn’t level and/or square, (at least as far as I could tell), I decided to use the slanted space that sat at the bottom of the old steering control panel.
This initial rush of work, set me on a quest to finish this behemoth chunk of wood, glue, and mutant staples. To turn it into a fancy looking arcade cabinet…or at least something my spouse would allow in the house.
I've also referenced previously that I am incompetent when it comes to carpentry.
SO, what might I have done, you ask?
Well, thankfully, I am still in possession of all major and minor members of my body. I'm sure more minor than major. Anyway...
I finally figured out a fairly crude way to make this work.
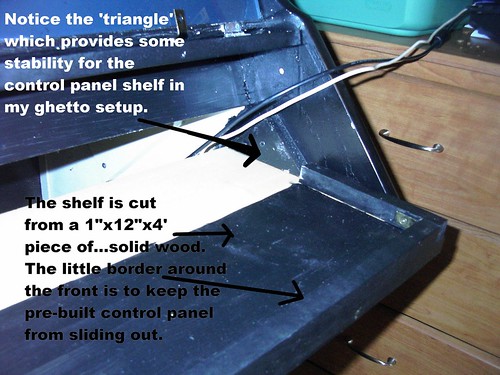
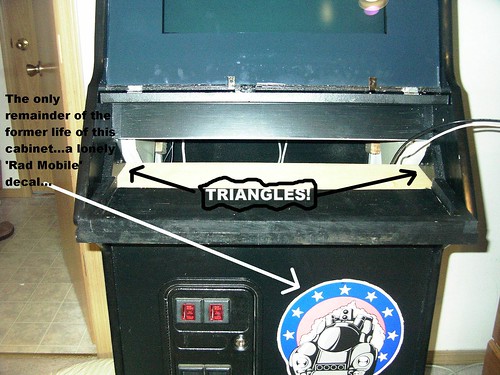
I attached...triangles.
It took me a while to figure out the proper angles to make these triangles made of 'MDF' to fit the cabinet. Once I did, I attached them with screws, (note to self - BUY A FREAKIN' DRILL!!!), and did it, as with everything on this project so far, by hand.
These first two were set as a base for a level 'shelf' of sorts. Basically, to provide a place for another piece of wood to sit on, without falling forward out of the cabinet or backwards into it.
Set back several inches from these and an inch above, I put almost identical triangles. Now, the long sides of these triangles faced each other.

Here's a hand drawing to make it a perhaps a little clearer:
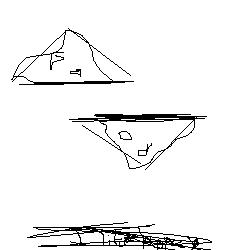
Then, I was able to take a shelf made o' another 1"x12" piece of Oak and slide it in there. No give to the shelf, plenty of weight it will hold, (what am I, YODA?), and so on.
I took a piece of the remaining MDF and figured out where to place it to cover the bottom part of the housing for the glass that sits in front of the monitor. Then, another trip to Home DepAH-t, where bought two small hinges, two packages of some L bracket ‘thingys’ to use to hold the glass in place, and a box of screws. I’ll add here that I had to buy the screws because I was, up to that point, just using any screws I had sitting around…when I started to use screws that were coming out the opposite side of the cabinet, I decided I probably should measure and make sure that things fit properly so that I didn’t have a bunch of screw ends sticking out of the sides of the cabinet, just waiting to injure my small humans. This shopping trip cost about $10.
Getting back to the detail, it actually worked out pretty well. The shelf that the pre-built controller will sit on is sort of funky looking…

- Wood Putty *
- 3 Spatula Lookin' Things To Spread The Wood Putty
- 1 Gallon Of Exterior Semi-Gloss Latex Black Paint
- 1 11 Piece Paint Every Crevice Roller/Brush Kit
- 1 Roll Of Tape Around Things You Don't Want To Paint Over But Still Do Tape
- 1 Undercabinet 18Watt Floor-S-ENT Light
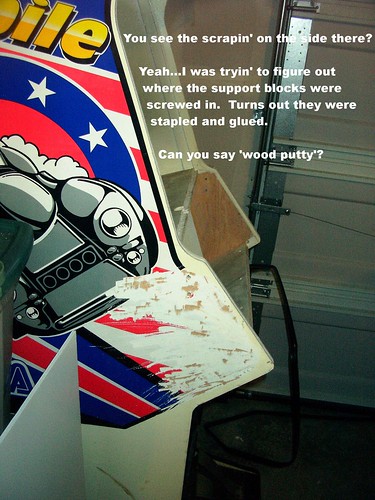
[* You see, I needed the Wood Putty to fix the damage I did when first trying to figure out how to disassemble the cabinet. I decided to use this little 'plane', (you know the scraper dealy that has a razor blade/chisel blade on the bottom to remove wood), to scrape off the big decal on the side so I could find the screw holes. As I wrote previously, it turns out there AREN'T any screw holes. So, I screwed up the cabinet...and to paint it without having dings and dents in those spots, I had to fill them before painting...so there, now you know.]
This brings the running total of the project to roughly $100 for materials and $100 for the original cabinet. All of the computer parts that wound up in it, (including the monstrous monitor), have been/are free. It's a nice advantage to working with technology. You get lots of cast off parts. However, those parts take up a lot of space if you collect them by the truckload.
I spent the remainder of this marathon construction weekend when I wasn't eating, sleeping, or relieving myself of excess bodily material working on this thing, (I worked on this thing for 12 hours Friday night into Saturday morning). The only other exception was some shopping with the wife and kids, and a 'slumber party' with my older two kids on Saturday night.
This process consisted mostly of removing the huge sideart decals. This took an ETERNITY. The use of a scraper, a hair dryer, and roughly two gallons of my sweat got them off. Then, another two gallons of sweat, two different types of adhesive removers, (one of which we already had and one of which I bought two cans of for $6), and a lot of cursing got the adhesive itself off.
Then, I sanded…by hand.
THEN, I painted this thing with three coats of the black paint...which looks green...until it dries...which takes quite a while.
...and, it looks pretty good.
(Sadly, the photos make it look like I painted this thing while I was drunk and mixing turpentine with the paint. It actually looks good though.)
Continue on to the other parts o' the M.A.M.E. adventure...if you DARE!
Part 1 - Part 2a - Part 2c - Part 2d - Part 3 - Part 4 - Dismantled - Random Statements Home
posted by L h a r l e s at 10:14 AM
![]()
1 Comments:
Los vinilos BARTOP imitan a la perfección las decoraciones oroginales de los antiguos muebles arcade y muebles BARTOP
Post a Comment
<< Home